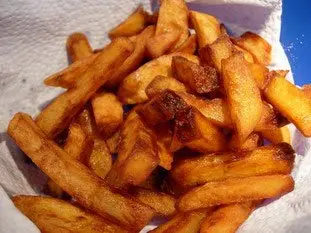
Real home-made chips*
A recipe from cooking-ez.com December 30th 2019453 K3.9
For 6 people, you will need:
Times:
| Preparation | Resting | Cooking | Start to finish |
|---|---|---|---|
| 30 min. | 1 hour | 20 min. | 1 hour 50 min. |
Step by step recipe
- 1: Stage 1: boiling.
Peel and rinse 1 kg potatoes. It's a good idea to use large potatoes. I have a preference for samba but bintje, and no doubt other varieties, are also quite suitable. - 2: Cut the potoatoes into fairly thick slices (about 1 cm or 0.4 inches).
- 3: Cut the slices into sticks of the same thickness. It's important not to make the chips too thin, otherwise they'll not be soft in the middle.
- 4: Put the cut chips in a large bowl under running water for 2 to 3 minutes, swishing them round from time to time until the water runs clear.
- 5: Prepare a large pan of lightly salted water and put the chips on to boil.
It's important that the chips are thoroughly cooked, to the point where the corners or edges begin to crumble, as you can see in the photo lower down, and become irregular.
It's a bit tricky, as the chips become fragile once cooked, but it's worth knowing that the more cooked the chips, the better they'll be. But do take care; a few minutes too long and you'll end up with potato soup. - 6: When they are well cooked, remove the chips gently and drain on a rack.
As soon as they are cool, put the rack in the fridge for at least 30 minutes to dry the chips. - 7: You can see on this close-up what I mentioned earlier: the chips are well cooked and their edges (as shown by the arrows) have started to break up. This is important as these little irregularities give a noticable extra crunch to the chips when fried.
- 8: Stage 2: first frying.
Fry the chips for the first time in very hot oil for 5 minutes.
Do this in batches if necessary. - 9: The aim is not to cook the chips, just part cook them. They should be barely coloured.
Drain them thoroughly, then tip them onto the rack again, and leave to wait for at least 30 minutes. - 10: Stage 3: second and final frying.
Put the chips back into the hot oil for about 5 minutes, removing them as soon as they have browned to your liking. - 11: Tip into a dish lined with a layer of absorbant paper, salt lightly and serve without delay.
Remarks
If you are used to frozen chips, you'll be amazed by the taste of these. It's a fair bit of work, but the result is worth it.You can improve on stage 2 by putting the pre-cooked chips in the fridge for at least 30 minutes.
Stage 1 and stage 2 can be done hours beforehand, even the previous day. You can freeze the chips after stage 1, maybe even after stage 2, but I've not yet tried this.
For me, nothing goes better with these chips than béarnaise sauce. In a good restaurant they are already great, but home made: a pure delight.
View this recipe : https://cooking-ez.com/divers/recipe-real-home-made-chips.php
February 23th 2026.

