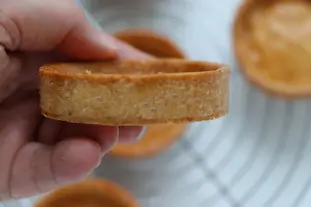
How to make tart cases
A recipe from cooking-ez.com October 3rd 202193 K4.2
For 6 cases, you will need:
- 1 300 g sweetcrust pastry (pâte sablée)
- 2 20 g beaten egg
- Total weight: 320 grams
Times:
| Preparation | Resting | Cooking | Start to finish |
|---|---|---|---|
| 1 hour 6 min. | 45 min. | 35 min. | 2 hours 30 min. |
Step by step recipe
- 1: We'll be using tart rings, preferably the micro-perforated thermoplastic type, 3" (80 mm) diameter. These are much more practical than the classic tins or moulds.
Space them out on a sheet of cooking parchment laid on a baking sheet. - 2: Roll out 300 g sweetcrust pastry (pâte sablée) really cold, straight from the fridge, to 1/8" (3 mm) thick. The best way to do this is to use a pair of pastry thickness guides.
- 3: Use a 3" (80 mm) cutter (or one of the tart rings) to cut out circles from the sweetcrust pastry...
- 4: ...and place one in each ring.
Put the baking sheet in the fridge.
Gather the leftover pastry into a large rectangle and put in the freezer for 10 minutes, or refrigerate for 30 minutes.
Note: Throughout this recipe, as always with pastry, cold is your friend. - 5: After chilling, your pastry will have firmed up again. Roll out once more to 1/8" (3 mm) thick in a rectangle about 10" (25 cm) x 7" (18 cm).
- 6: Cut 6 strips of pastry 1" (25 mm) wide, plus a spare one if you err on the side of caution.
- 7: Lay the strips on another baking sheet and put in the freezer for 5 minutes, or refrigerate for 10 minutes.
- 8: Take out the tray of rings and put a strip of pastry into the first, vertically around the edge.
It will be a bit too long and will stand up above the top of the ring. This is normal and intentional. - 9: Trim the end of the strip with scissors or a knife to just fit inside the ring.
Press the ends together to seal and make as neat as possible. - 10: Press around the bottom edge to seal the side and base together.
- 11: Prepare each case like this, taking the strips out of the fridge only as you need them, to ensure they stay really cold.
Put the tray of cases back in the fridge for 30 minutes or in the freezer for 10 minutes. - 12: Preheat the oven to 320°F (160°C). Trim off the spare pastry around the tops of the rings with a small knife to give a perfect edge.
Note that we do this just before baking and while the pastry is really cold, to limit shrinkage during cooking. - 13: Trim all the cases like this, then bake without delay for 20 to 25 minutes.
- 14: Keep a close eye on them for the first 10 minutes, as there is a risk that the top edge of the pastry might droop, as shown in this photo.
If this happens, open the oven and use the back of a small spoon to gently push the pastry upright again. - 15: After 25 minutes, take the cases out, but leave the oven on.
- 16: Remove the rings. Be careful, as these will be hot! The best way is to slip a fork under the edge of the ring, then lift it gently.
- 17: Tip: put the rings in to soak right away, then they will be easier to clean later.
- 18: Use a brush to glaze the cases. Do this gently as they are still fragile (not fully cooked yet).
- 19: Put them back in the oven for a further 10 minutes.
- 20: Leave to cool on a wire rack.
- 21: When cold, you can give your tart cases a professional finishing touch by "filing" them with a microplane grater to make them smooth and even.
- 22: This photo shows the case before filing (red arrow) and after filing smooth (green arrow).
- 23: Your finished tart cases are ready for filling.
- 24: Now you can see how professional they look with their smooth, even sides.
It takes effort, but the results are worth it.
Remarks
This method can be used with other kinds of tart pastry: shortcrust, sweet, etc.A possible variation is to put the side band in first, then the base circle. This is the opposite way round and a little trickier, but gives a perfect edge around the base after baking.
The glaze applied in stage 18 has two functions: it gives a better colour, of course, but also protects the bottom of the tart from moisture in the filling, avoiding the need to seal the pastry with chocolate (chablonnage).
View this recipe : https://cooking-ez.com/recipe-how-to-make-tart-cases.php
February 18th 2026.

