This site uses only a few technical cookies necessary for its operation. By continuing to browse, you accept their use.
To find out more...
To find out more...
How to roll out pastry for a tart
Lining the bottom of a tart tin with pastry is not as simple as it sounds.
To help you get it right every time, here's an illustrated procedure.
To help you get it right every time, here's an illustrated procedure.
318 K 4.0/5 (60 reviews)687689
Last modified on: October 13th 2010
For 1 tart, you will need:
- 1
 300 g sweetcrust pastry (pâte sablée)
 - Total weight: 300 grams
Times for this recipe
Preparation
25 min.
If you start now, at , you will finish around : ?.Change start time
To finish around 7pm, you'll need to have started before: .Change end time
Step by step recipe
Stage 1 - ⌛ 1 min.
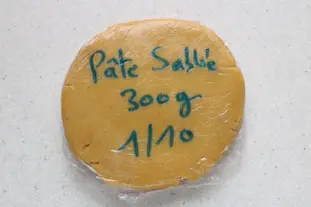
To start with, it is necessary to use pastry:
- Which is not in a ball, but rather flat like a thick pancake.
- In a ball, you will break it rather than spread it with the rolling pin.
- Which is very cold, straight from the fridge if possible.
- If pastry is warm, therefore soft, it will be easy to roll out but will stick to the rolling pin and will be practically impossible to put in the mould.
Stage 2 - ⌛ 10 min.
Dust working surface and rolling pin generously with flour (don't worry about using too much, the surplus will be removed before baking).
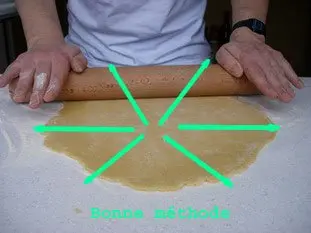
Roll out pastry with the rolling pin, and for that here is the most important knack: you should always roll from the centre out to the edge of the pastry.
Roll out pastry with the rolling pin, and for that here is the most important knack: you should always roll from the centre out to the edge of the pastry.
Stage 3
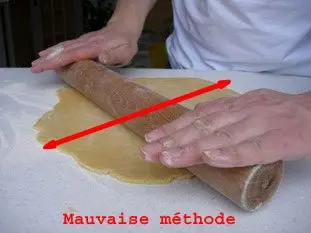
Never pass the rolling pin over the whole surface of the pastry, you will inevitably made a bump in the middle.
You should work as quickly as possible so that your pastry stays very cold. Flour the top, and/or turn the pastry during this operation.
Roll out to the required thickness (2 or 3 mm usually), or size, depending on your mould (to try, put your mould gently on the pastry, which should be about 2 cm larger all round).
Stage 4 - ⌛ 3 min.
Once the pastry is rolled out, it is necessary to transfer it to the mould, which is a delicate operation.
For this, the best way is to pass a metal spatula or slice underneath, then wrap it around the rolling pin, and then unroll it over the mould.
You can watch a video demonstration on the right.
For this, the best way is to pass a metal spatula or slice underneath, then wrap it around the rolling pin, and then unroll it over the mould.
You can watch a video demonstration on the right.
Stage 5 - ⌛ 3 min.
Then, you need to press the pastry into the bottom and sides of the mould, so that it is properly lined, and so that the bottom of pastry when cooked will be nice and solid.
You can watch a video demonstration on the right.
You can watch a video demonstration on the right.
Stage 6 - ⌛ 3 min.
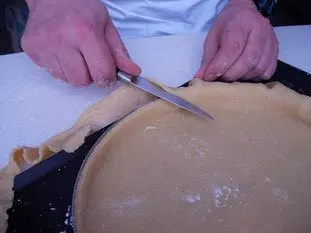
Once this operation is complete, trim off the surplus pastry with a knife by following round the top of the mould.
Note: With this surplus, you can make small tarts, or if it is a sweetcrust pastry, small biscuits to serve with coffee for instance.
Note: With this surplus, you can make small tarts, or if it is a sweetcrust pastry, small biscuits to serve with coffee for instance.
Stage 7 - ⌛ 2 min.
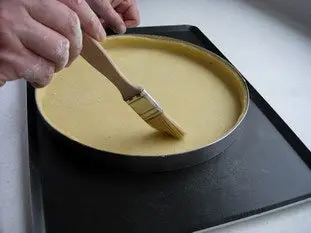
Remove any surplus flour with a brush.
Stage 8 - ⌛ 1 min.
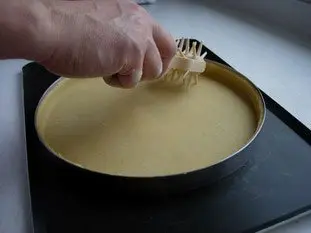
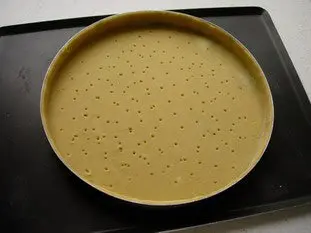
And finally, prick over the bottom of the mould with a fork or a "pique-vite", to avoid the pastry bubbling up during baking.
Put the mould in the fridge for one hour so that pastry firms up before baking, it is then ready for use.
Put the mould in the fridge for one hour so that pastry firms up before baking, it is then ready for use.
Remarks
In the photographs I'm using a tart ring (which is a kind of bottomless mould) rather than a classic mould, I recommend it to you because it's much more practical and easy to remove a tart from the circle than from a mould. You can find all sizes in specialist stores, choose stainless ones.
Source: Home made.
Support the site ❤️
This site has been around for years, with no advertising, no pop-ups, no traps, no information gathering, and I maintain it alone, out of passion.
If you liked this recipe, your support helps me to keep going.
Support cuisine-facile.com
If you liked this recipe, your support helps me to keep going.
Support cuisine-facile.com
Nutritional information
| Proteins | Carbohydrates | Fats | Calories | Energy | |
|---|---|---|---|---|---|
| Per 100 g | 89 g RDI=137 % | 507 g RDI=191 % | 381 g RDI=522 % | 5,813 kcal RDI=291 % | 24,338 kJ RDI=291 % |
| Whole recipe | 267 g RDI=411 % | 1,521 g RDI=574 % | 1,143 g RDI=1,566 % | 17,439 kcal RDI=872 % | 73,014 kJ RDI=872 % |
How much will it cost?
For 1 tart
1.55 €
Note: Be careful, these prices are only an estimate, you can consult the table of prices by ingredients used for this estimate.
This recipe uses (among others)

Sweetcrust pastry (pâte sablée)
You can get more informations, or check-out other recipes which use it, for example: Parisian-style chocolate custard tartFlaked almond tartRhubarb-hazelnut tartPear and lime meringue piePlum tart "En passant par la Lorraine" See all 45 other
Other recipes you may also like


News list of cooking-ez.com
Sign up to receive the latest recipes, next batch due to be sent on 2026-05-24
We'll never share your e-mail address with anyone else.
Post a comment or question
Follow this recipe (as 2 people already do)
Receive an e-mail as soon as this recipe is modified or receives a new comment.
We'll never share your e-mail address with anyone else.
Alternatively: you can subscribe to the mailing list of cooling-ez.com , you will receive a e-mail for each new recipe published on the site.