Canadian rice pudding

You are no doubt familiar with classic rice pudding, so simple and delicious. Well, here's a version with a Canadian twist: sweetened with maple syrup instead of sugar, added in two stages.
59 K 4.1/5 (9 reviews)
Last modified on: January 31th 2021
For 6 people, you will need:
- 1
 200 g rice
 - 2
 1 litre whole milk
 - 3
 100 g maple syrup
 - 4 100 g maple syrup
- Total weight: 1,400 grams
Change measures:
Times for this recipe
Preparation: 15 min.
Cooking: 55 min.
All in all: 1 hour 7 min.
If you start now, at , you will finish around : ?.Change start time
To finish around 7pm, you'll need to have started before: .Change end time
Step by step recipe
Stage 1 - 10 min.

Put a saucepan of water on high heat. When it boils, tip in 200 g rice.
Stage 2 - 5 min.
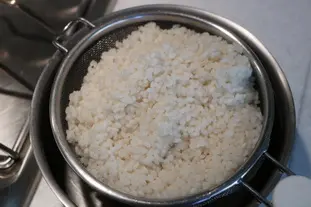
Leave to cook for about 5 minutes, then drain.
Stage 3 - 10 min.

Pour 1 litre whole milk and 100 g maple syrup into a large non-stick pan and bring up to a simmer.
Stage 4 - 40 min.

Add the pre-cooked rice and mix well (with a soft spatula, for instance).
Turn the heat down to minimum and leave to cook gently and thicken.
Turn the heat down to minimum and leave to cook gently and thicken.
Stage 5

Every time a skin forms on the surface (which is quite normal), simply mix this in.
Stage 6

Continue cooking until the rice pudding is smooth and fairly thick.
Stage 7 - 1 min.
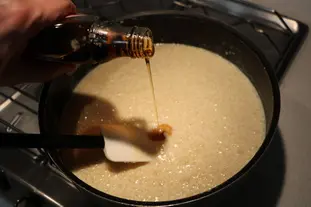
Take off the heat and add 100 g maple syrup.
Stage 8 - 1 min.

Mix one last time and your Canadian-style rice pudding is ready.
Stage 9

Put into ramekins for individual servings.
Remarks
It is important to add the maple syrup in two stages to give the rice pudding the full benefit of its flavour.
If you'd like even more flavour, you can increase the quantity of maple syrup added the second time.
If you'd like even more flavour, you can increase the quantity of maple syrup added the second time.
Keeping: 1 or 2 days in the fridge, covered with plastic film.
Source: Home made.
Nutritional information
| Proteins (gr) | Carbohydrates (gr) | Fats (gr) | Energy value (in k-calories) | Energy value (in k-joules) | |
|---|---|---|---|---|---|
| Whole recipe | 50 RDI=20 % | 210 RDI=20 % | 40 RDI=5 % | 1,360 RDI=70 % | 5,710 RDI: 70 % |
| Per 100 g | 3 RDI=1 % | 10 RDI=1 % | 2 RDI=0 % | 100 RDI=5 % | 410 RDI: 5 % |
| Per person | 9 RDI=3 % | 30 RDI=3 % | 5 RDI=1 % | 230 RDI=10 % | 950 RDI: 10 % |
How much will it cost?
- For 6 people : $5.35
- Per person : $0.90
Change currency: ![]()
![]()
![]()
Note: Be careful, these prices are only an estimate, you can consult the table of prices by ingredients used for this estimate.
This recipe uses (among others)

Whole milk
Like these other recipes: Far Normandy-Brittany, Celeriac and parsley soup, Paris flan filling, Creamy polenta with green asparagus, Hearty potato and ham gratin, ... See them all 68
Rice
Like these other recipes: Indian rice pudding, Paella, Crispy spinach rolls, Rice pudding with fruit and nuts, Chicken with rice and leeks, ... See them all 21

Maple syrup
Like these other recipes: Pear and chocolate Paris puddings, Pain perdu, Maple syrup cream sugar, Baked apples from St Aubin le Vertueux, Moist cereal bars, ... See them all 10
Other recipes you may also like

Fillet of salmon meunière
A fillet of salmon can be cooked in a similar way to sole: à la meunière. The fish is lightly floured, pan-fried in butter and served drizzled with lemony butter and flat-leaved parsley. Every bit as good as sole. April 11th 202155 K 25 min.
Pear tart with almond cream
This is a very quick and easy tart to make, as everything (or almost) can be done in advance. A piece of sweetcrust pastry, some almond cream and pears? You have "everything you need". March 17th 2011377 K4.3 1 hour 15 min.

Fresh fruit in sabayon
Fresh grapefruit and / or pears, covered with a sabayon and a pinch of citrus crunch. February 21th 2011300 K4.7 55 min.

Bouquet garni
Used very frequently in French cuisine, a secret of French chefs, it adds flavour to a lot of recipes, and it's easy to prepare. The basic principle is to make a small bundle of herbs, bind them in green leek leaves and to tie it up, so that the whole thing can be removed and discarded easily after cooking. March 21th 2017431 K3.5 15 min.

Clarified butter
This is a way of melting butter to eliminate all the impurities. The clarified butter can then be heated without spoiling, and is more digestible. It is ideal for cooking at high temperatures where small black specks would spoil the appearance, or for emulsified sauces like béarnaise or mousseline. June 21th 2017478 K4.2 2 hours 15 min.
News list of cooking-ez.com
Sign up to receive the latest recipes (next batch due to be sent on 2025-10-12)
Note: We'll never share your e-mail address with anyone else.
Post a comment or question
Follow this recipe
If you are interested in this recipe, you can "follow" it, by entering your email address here. You will then receive a notification immediately each time the recipe is modified or a new comment is added. Please note that you will need to confirm this following.
Note: We'll never share your e-mail address with anyone else.
Alternatively: you can subscribe to the mailing list of cooling-ez.com , you will receive a e-mail for each new recipe published on the site.