Surprise bread
This recipe is for a large surprise bread so you can make six layers (48 small sandwiches if you divide each layer in 8), with three different flavours: smoked salmon/lime, smoked ham/butter, mayonnaise/chicken.
Last modified on: December 27th 2020
For 1 Surprise bread, you will need:
- 1
 2 kgs bread dough
 - 2
 6 slices smoked ham
 - 3
 6 slices smoked salmon
 - 4
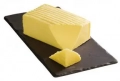
 120 g butter
 - 5
 ½ lime
 - 6
 100 g mayonnaise
 - 7
 200 g cooked chicken
 - Total weight: 3,255 grams
Times for this recipe
Preparation
1 hour 35 min.
Resting
4 hours
Cooking
50 min.
All in all
6 hours 25 min.
When should you start or finish this recipe?
If you start now, at , you will finish around : ?.Change start time
To finish around 7pm, you'll need to have started before: .Change end time
Step by step recipe
Stage 1 - ⌛ 10 min.
If you are making your own bread, proceed as for the new leavened bread or mixed seed bread (as in these photos).
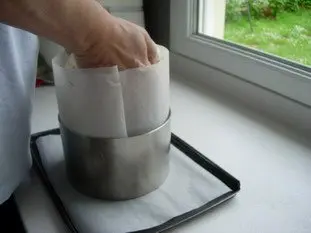
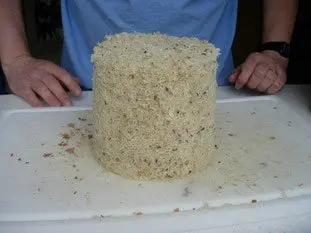
Put the dough seam downwards, in a large deep round tin or mould, lined with baking parchment to facilitate turning out (unless you are using a non-stick mould).
The mould in this photo is 20 cm (8") diameter, 12 cm (4.5") high.
Put the dough seam downwards, in a large deep round tin or mould, lined with baking parchment to facilitate turning out (unless you are using a non-stick mould).
The mould in this photo is 20 cm (8") diameter, 12 cm (4.5") high.
Stage 2 - ⌛ 2 hours
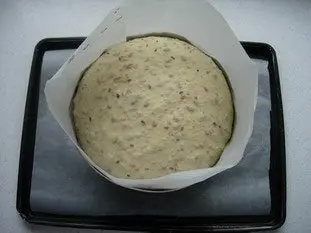
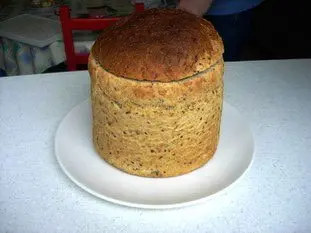
After two hours, when the dough is well risen, bake a little longer than a normal loaf.
Stage 3 - ⌛ 50 min.
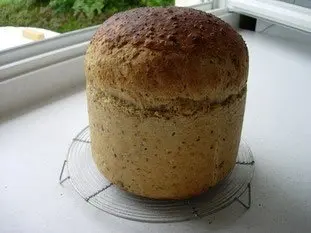
Turn out and leave to cool on a wire rack.
The results are better if you use a loaf that's not too fresh, so make it the day before.
The results are better if you use a loaf that's not too fresh, so make it the day before.
Stage 4 - ⌛ 5 min.
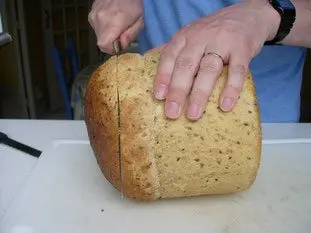
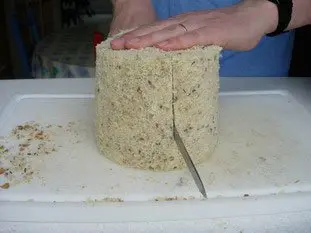
On the day, cut the top off the loaf, just where it becomes rounded, to obtain the smallest possible lid, and the largest straight cylinder possible.
Stage 5 - ⌛ 5 min.
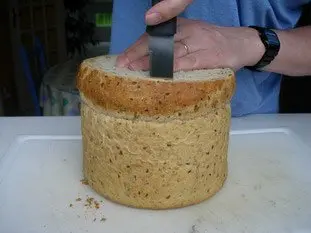
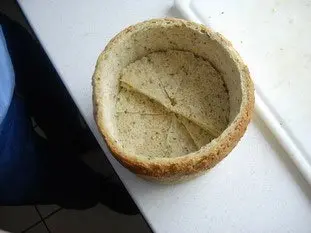
With a bread knife (or other serrated knife - this is important), cut vertcally all around the inside of the loaf. Go round twice if necessry to make sure it's cut through from top to bottom.
Stage 6 - ⌛ 5 min.
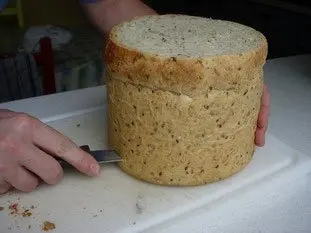
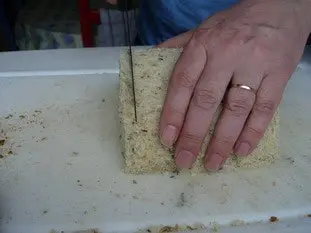
Insert the knife into the base of the loaf and cut using a sweeping, sawing movement.
The aim is to slice off the base horizontally to obtain a "perfect" crumb cylinder.
The aim is to slice off the base horizontally to obtain a "perfect" crumb cylinder.
Stage 7 - ⌛ 10 min.
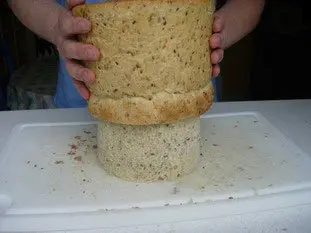
Now comes the tricky moment: extracting the soft cylinder of bread intact from its ring of crust.
It should be fairly easy, if you have cut round well enough beforehand, to turn the loaf upside down and shake it gently.
You can also slip a metallic spatula or a pallette knife down the side and make small see-saw movements.
Don't get bad tempered or panic, but go at it gently, carefully, and stay zen...
Stage 8
If you succeed and manage this, what follows is only sandwiches!
Stage 9 - ⌛ 3 min.
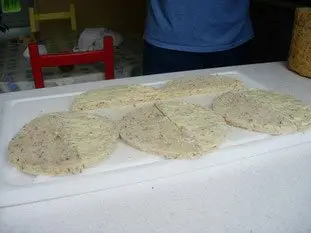
Cut the block of bread in half vertically.
Stage 10 - ⌛ 5 min.
Then slice each half thinly (1/2 cm, 1/4" approx.).
You will need an even number of slices, and keep them in order, because they will be assembled in pairs, and it is much easier if they were cut next to each other with similar size and shape.
Then, begin the fillings:
You will need an even number of slices, and keep them in order, because they will be assembled in pairs, and it is much easier if they were cut next to each other with similar size and shape.
Then, begin the fillings:
Stage 11 - ⌛ 5 min.
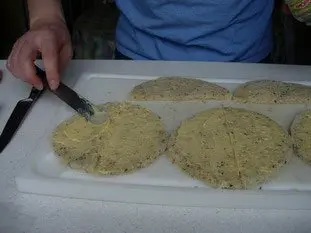
For smoked ham: prepare 3 pairs of ½ slices, and butter one of each pair.
Stage 12 - ⌛ 5 min.
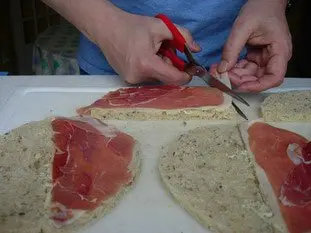
Put a slice of ham on the butter, and trim of any that overhangs the bread with scissors or a very sharp knife (it's easier with scissors ).
Stage 13 - ⌛ 1 min.
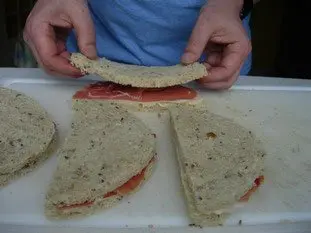
Put the top slices on the sandwiches.
Stage 14 - ⌛ 5 min.
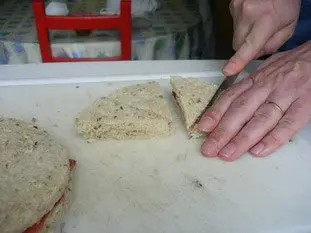
And cut each one into 4.
Stage 15 - ⌛ 5 min.
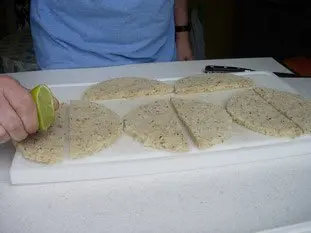
For smoked salmon: prepare 3 pairs of ½ slices, squeeze lime juice one slice of each pair, and butter the other.
Stage 16 - ⌛ 5 min.
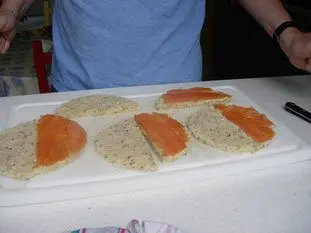
On the butter put a slice of smoked salmon, trim off any extra, and complete the sandwiches, then cut into 4.
Stage 17 - ⌛ 5 min.
For chicken mayonnaise: prepare 3 pairs of ½ slices, and spread mayonnaise over each one.
Stage 18 - ⌛ 5 min.
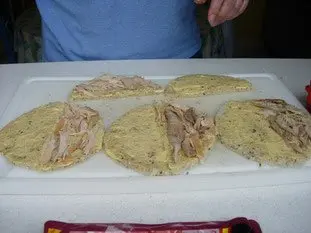
Arrange small pieces of cooked chicken on half, complete the sandwiches, and cut into 4.
Stage 19 - ⌛ 5 min.
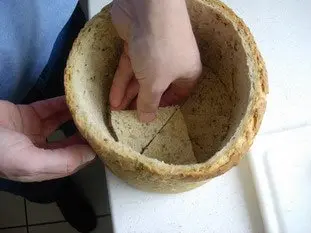
Begin the assembly of the surprise bread by making a layer of 8 sandwiches of one filling.
Stage 20 - ⌛ 5 min.
Continue to fill with a different type of sandwich in each layer.
Stage 21 - ⌛ 5 min.
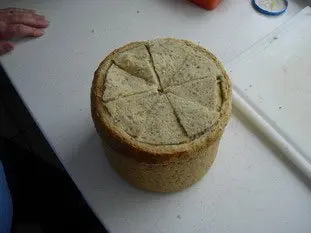
Right to the top of the loaf.
Stage 22 - ⌛ 2 hours

Then add the lid, and refrigerate for a few hours.
Remove and leave at room temperature one hour before serving, so that the sandwiches are not too cold (or they will have less flavour).
Remove and leave at room temperature one hour before serving, so that the sandwiches are not too cold (or they will have less flavour).
Remarks
For the bread you can use any kind you like, it's a matter of taste. Personally I prefer leavened bread or even better mixed seed bread (as in the photos), but you can also use sandwich bread, in which case replace 400g white flour with 100g rye flour + 300g whole-wheat flour.
For the fillings, you can vary ad infinitum. In this recipe there are 6 layers with 3 differents fillings, but it would be more interesting to have a different filling in each layer. Here are some more ideas:
An idea to try: surprise bread with sweet fillings, for a children's party for example, with jams, honey, chocolate...
In this recipe each layer of the sandwiches is cut into 8, but if it's for an aperitif, it's wiser to cut them into 10 or 12 to makes smaller sandwiches, and avoid filling up your guests before the meal.p>If you'd like more information about making your own bread, look at this dedicated page.
For the fillings, you can vary ad infinitum. In this recipe there are 6 layers with 3 differents fillings, but it would be more interesting to have a different filling in each layer. Here are some more ideas:
- A little cream cheese, pepper, salt and a very large handful of freshly chopped fresh herbs
- Tuna rillettes
- Hoummous
- Taztikis
- Roquefort mixed with a little butter and a few walnuts
- Etc...
An idea to try: surprise bread with sweet fillings, for a children's party for example, with jams, honey, chocolate...
In this recipe each layer of the sandwiches is cut into 8, but if it's for an aperitif, it's wiser to cut them into 10 or 12 to makes smaller sandwiches, and avoid filling up your guests before the meal.p>If you'd like more information about making your own bread, look at this dedicated page.
Source: Home made.
Support the site ❤️
This site has been around for years, with no advertising, no pop-ups, no traps, no information gathering, and I maintain it alone, out of passion.
If you liked this recipe, your support helps me to keep going.
Support cuisine-facile.com
If you liked this recipe, your support helps me to keep going.
Support cuisine-facile.com
Nutritional information
| Proteins | Carbohydrates | Fats | Calories | Energy | |
|---|---|---|---|---|---|
| Per 100 g | 115 g RDI=178 % | 706 g RDI=267 % | 35 g RDI=49 % | 305 kcal RDI=15 % | 1,278 kJ RDI=15 % |
| Whole recipe | 3,769 g RDI=5,799 % | 23,002 g RDI=8,680 % | 1,154 g RDI=1,582 % | 9,938 kcal RDI=497 % | 41,612 kJ RDI=497 % |
How much will it cost?
For 1 Surprise bread
25.20 €
Note: Be careful, these prices are only an estimate, you can consult the table of prices by ingredients used for this estimate.
This recipe uses (among others)

Bread dough
You can get more informations, or check-out other recipes which use it, for example: Baker's chicken and potato tartSpecial Cheese and Walnut SticksSpring BreadSpecial Parmesan baguettesBaker's pizza See all 6 other

Cooked chicken
You can get more informations, or check-out other recipes which use it, for example: Gratin of chicken with rice and sautéed mushroomsCrispy rolls with chicken and leekValay saladBaked eggs with chicken and spinachBeans with tomatoes See all 17 other

Mayonnaise
You can get more informations, or check-out other recipes which use it, for example: Green Piedmont SaladCucumber and salmon saladTartar sauceRoscoff saladMixed salad with curry mayo See all 25 other
Other recipes you may also like


News list of cooking-ez.com
Sign up to receive the latest recipes, next batch due to be sent on 2026-07-26
We'll never share your e-mail address with anyone else.
Follow this recipe (as 9 people already do)
Receive an e-mail as soon as this recipe is modified or receives a new comment.
We'll never share your e-mail address with anyone else.
Alternatively: you can subscribe to the mailing list of cooling-ez.com , you will receive a e-mail for each new recipe published on the site.
The 8 comments already posted on this recipe